笔者环境
主机: 台式机
CPU: amd 3600
GPU: GTX 2060
不同电脑(尤指双显卡的笔记本)的显卡驱动安装方式可能不太一样,但安装显卡后后续步骤应该通用。
本文仅供参考~~
安装成功后的最终版本如下,仅供参考:
nvidia 驱动:  430.50
tensorflow: 2.0
Cuda: 10.1
cuDNN: 7.6.4
参考连接:
deepin15.8+NVIDIA_390.87+cuda9.0+cudnn7.4+tensorflow-gpu_1.9配置血泪史
deepin 15.10.2 安装 Python3.6.9
deepin 15.10.2 安装 Jupyter-notebook
安装显卡驱动
此处有参考这里 Deepin 下安装 Nvidia 驱动
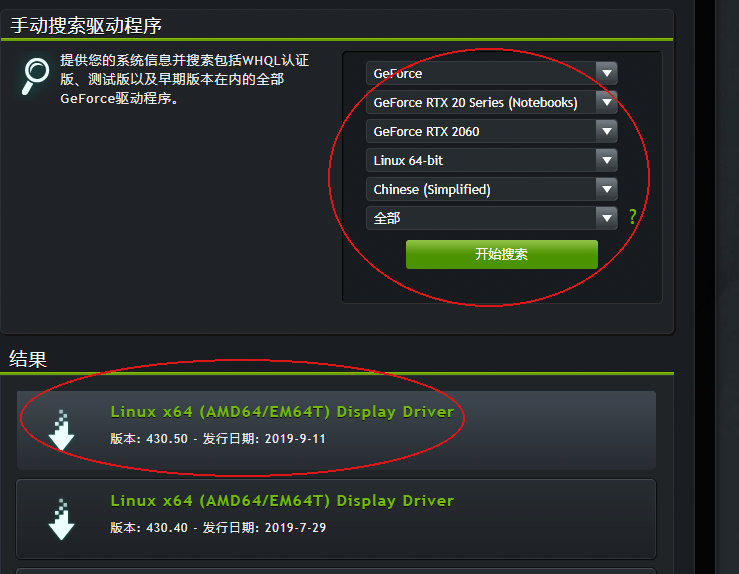
下载驱动
在 https://www.geforce.cn/drivers 找到合适的驱动并下载,
下载完好放到在主目录(NVIDIA-Linux-x86_64-430.50.run)
禁用nouveau驱动
# 先安装一个pluma编辑器,或者你可以手动进目录去编辑
sudo apt-get install pluma
sudo pluma /etc/modprobe.d/blacklist.conf

## 或者通过文件夹右键管理员打开,然后手动打开对应的文件(可能需要新建blacklist.conf)
## 然后在文件中写入内容如下---:
blacklist nouveau
blacklist lbm-nouveau
options nouveau modeset=0
alias nouveau off
alias lbm-nouveau off
接下来需要把刚才更改的这个生效
sudo update-initramfs -u
重启系统,再次进入系统
安装显卡驱动
关闭用户操作界面
sudo service lightdm stop
命令行模式下输入账号密码登录后,需要进入字符命令模式
sudo init 3
给与目标nvidia驱动可执行权限--注意路径一定要正确
chmod 777 ./NVI.............run
安装显卡驱动, 这里需要注意的是,安装过程中会出现很多弹框提示,如果懂的话,按照步骤操作即可,如果不懂的话,一路选择 YES 即可
sudo ./NVI.............run
不出意外的话,这里是能够安装成功的。如果失败的话也没关系,继续开启下面的用户界面,再寻找其他教程安装显卡驱动吧。显卡驱动下面的步骤依然适用 :)
开启用户界面
sudo service lightdm start
判断显卡驱动是否安装成功
第一种:安装成功之后,系统分辨率应该是变成你显示器支持的最大分辨率的。
第二种:命令行输入 nvidia-smi, 出现以下类似界面
jansora@jansora-PC:~$ nvidia-smi
Fri Oct 18 15:37:06 2019
+-----------------------------------------------------------------------------+
| NVIDIA-SMI 430.50       Driver Version: 430.50       CUDA Version: 10.1     |
|-------------------------------+----------------------+----------------------+
| GPU  Name        Persistence-M| Bus-Id        Disp.A | Volatile Uncorr. ECC |
| Fan  Temp  Perf  Pwr:Usage/Cap|         Memory-Usage | GPU-Util  Compute M. |
|===============================+======================+======================|
|   0  GeForce RTX 2060    Off  | 00000000:08:00.0  On |                  N/A |
| 34%   33C    P8    21W / 165W |     91MiB /  5931MiB |      0%      Default |
+-------------------------------+----------------------+----------------------+

+-----------------------------------------------------------------------------+
| Processes:                                                       GPU Memory |
|  GPU       PID   Type   Process name                             Usage      |
|=============================================================================|
|    0      4279      G   /usr/lib/xorg/Xorg                            60MiB |
|    0      4733      G   kwin_x11                                      17MiB |
+-----------------------------------------------------------------------------+
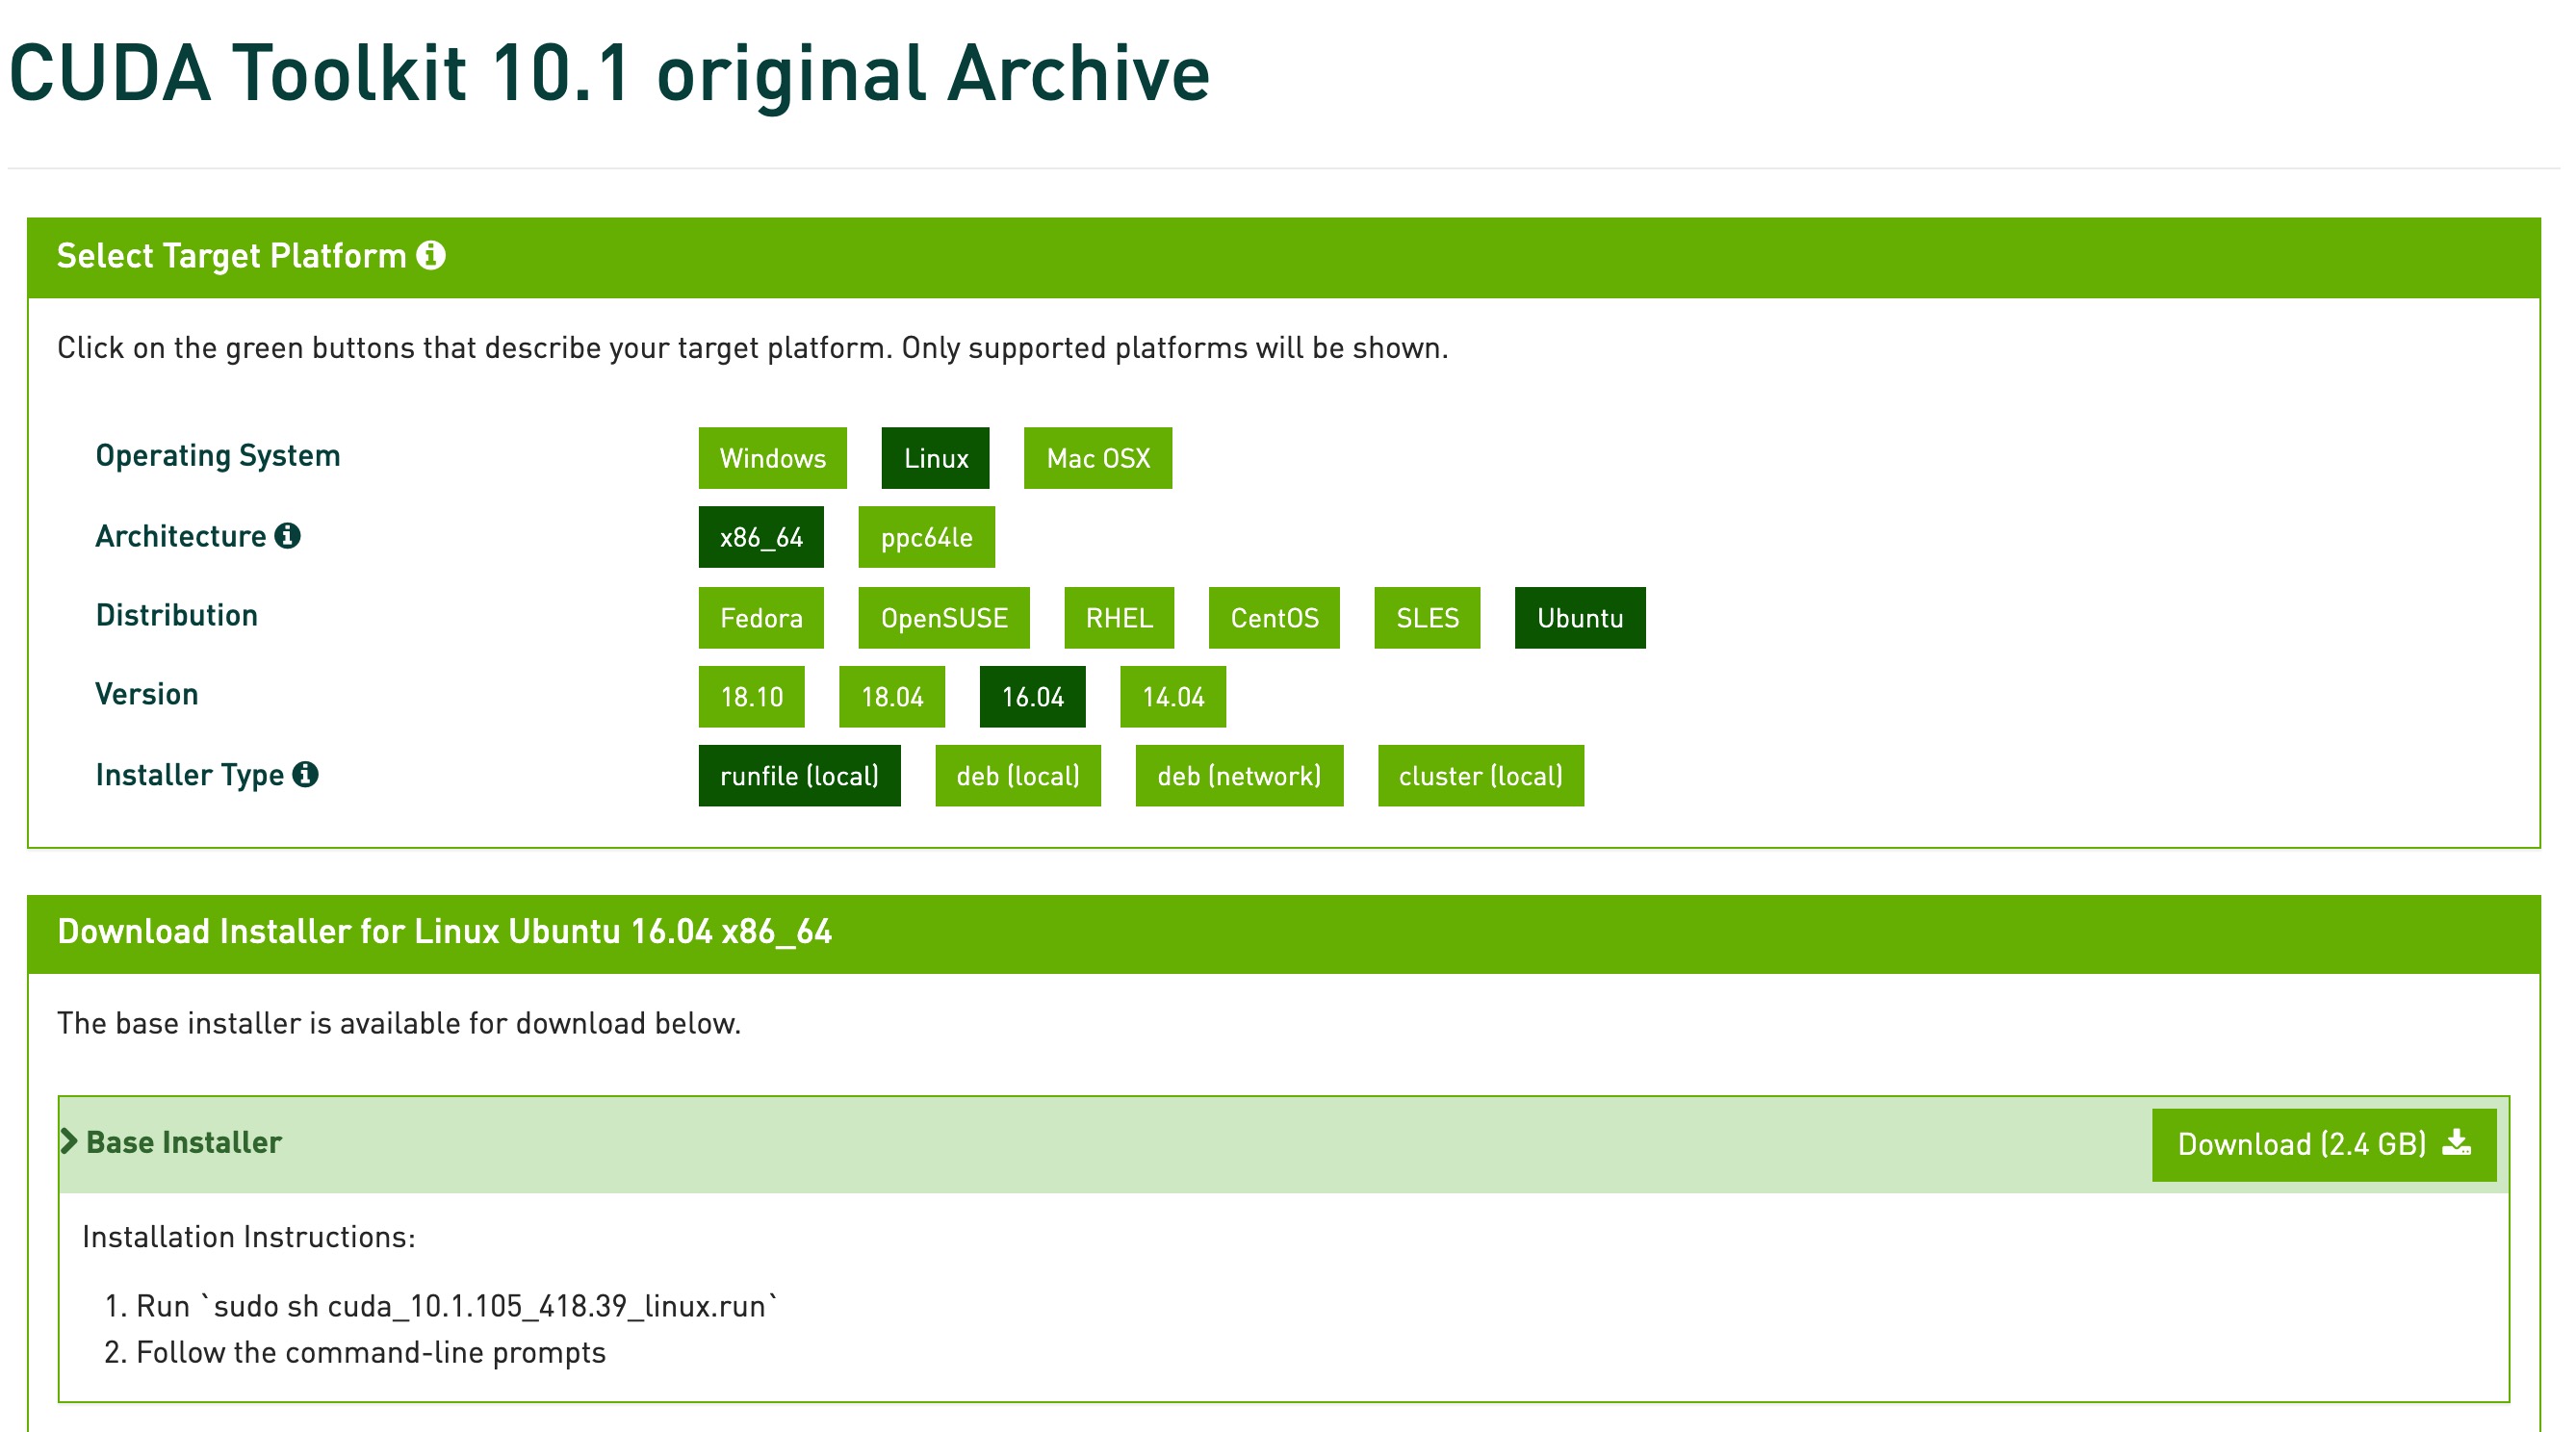
安装 cuda 10.1
请确保你的显卡驱动支持
cuda10.1(CUDA 10.1 requires 418.x or higher.)
下载 cuda 10.1
赋予执行权限
chmod 755 cuda_10.1.243_418.87.00_linux.run
开始安装 cuda10.1
deepin 15.11 安装cuda10.1不能使用sudo 执行root权限来安装, 否则会抛出 跟
/var/log/nvidia/.uninstallManifests相关的 error,这里不过多赘述该原因了,
可以通过安装到用户目录下后,再移动到/usr/local方式来绕过这个error,详情请看以下步骤
创建安装到的文件夹
cd ~
mkdir cuda-10.1
执行安装文件, 安装到 ~/cuda-10.1 目录下.
执行后会有阅读指南,按 [[q]] 跳过指南. 输入 [[accept]] 开始安装
./cuda_10.1.243_418.87.00_linux.run --toolkitpath=$HOME/cuda-10.1 --defaultroot=$HOME/cuda-10.1
选择 CUDA Toolkit 10.1 即可,其他都去掉 [[X]] 号
┌──────────────────────────────────────────────────────────────────────────────┐
│ CUDA Installer                                                               │
│ - [ ] Driver                                                                 │
│      [ ] 418.87.00                                                           │
│ + [X] CUDA Toolkit 10.1                                                      │
│   [ ] CUDA Samples 10.1                                                      │
│   [ ] CUDA Demo Suite 10.1                                                   │
│   [ ] CUDA Documentation 10.1                                                │
│   Options                                                                    │
│   Install                                                                    │
│ Up/Down: Move | Left/Right: Expand | 'Enter': Select | 'A': Advanced options │
└──────────────────────────────────────────────────────────────────────────────┘
不出意外的话,这里是能够安装成功的
移动到 /usr/local 下
sudo mv cuda-10.1 /usr/local/
配置软连接
sudo ln -sv /usr/local/cuda-10.1/ /usr/local/cuda
配置Cuda环境变量
配置到 ~/.bashrc 或 /etc/profile 都可以, 建议配置到 /etc/profile
sudo vim /etc/profile , 加入以下内容
export LD_LIBRARY_PATH=/usr/local/cuda/lib64/:$LD_LIBRARY_PATH
export PATH=/usr/local/cuda/bin:$PATH
使环境变量配置生效
source /etc/profile
检测安装是否成功
nvcc -V
出现以下类似信息,即安装成功。
nvcc: NVIDIA (R) Cuda compiler driver
Copyright (c) 2005-2019 NVIDIA Corporation
Built on Sun_Jul_28_19:07:16_PDT_2019
Cuda compilation tools, release 10.1, V10.1.243
安装cuDNN 7.6
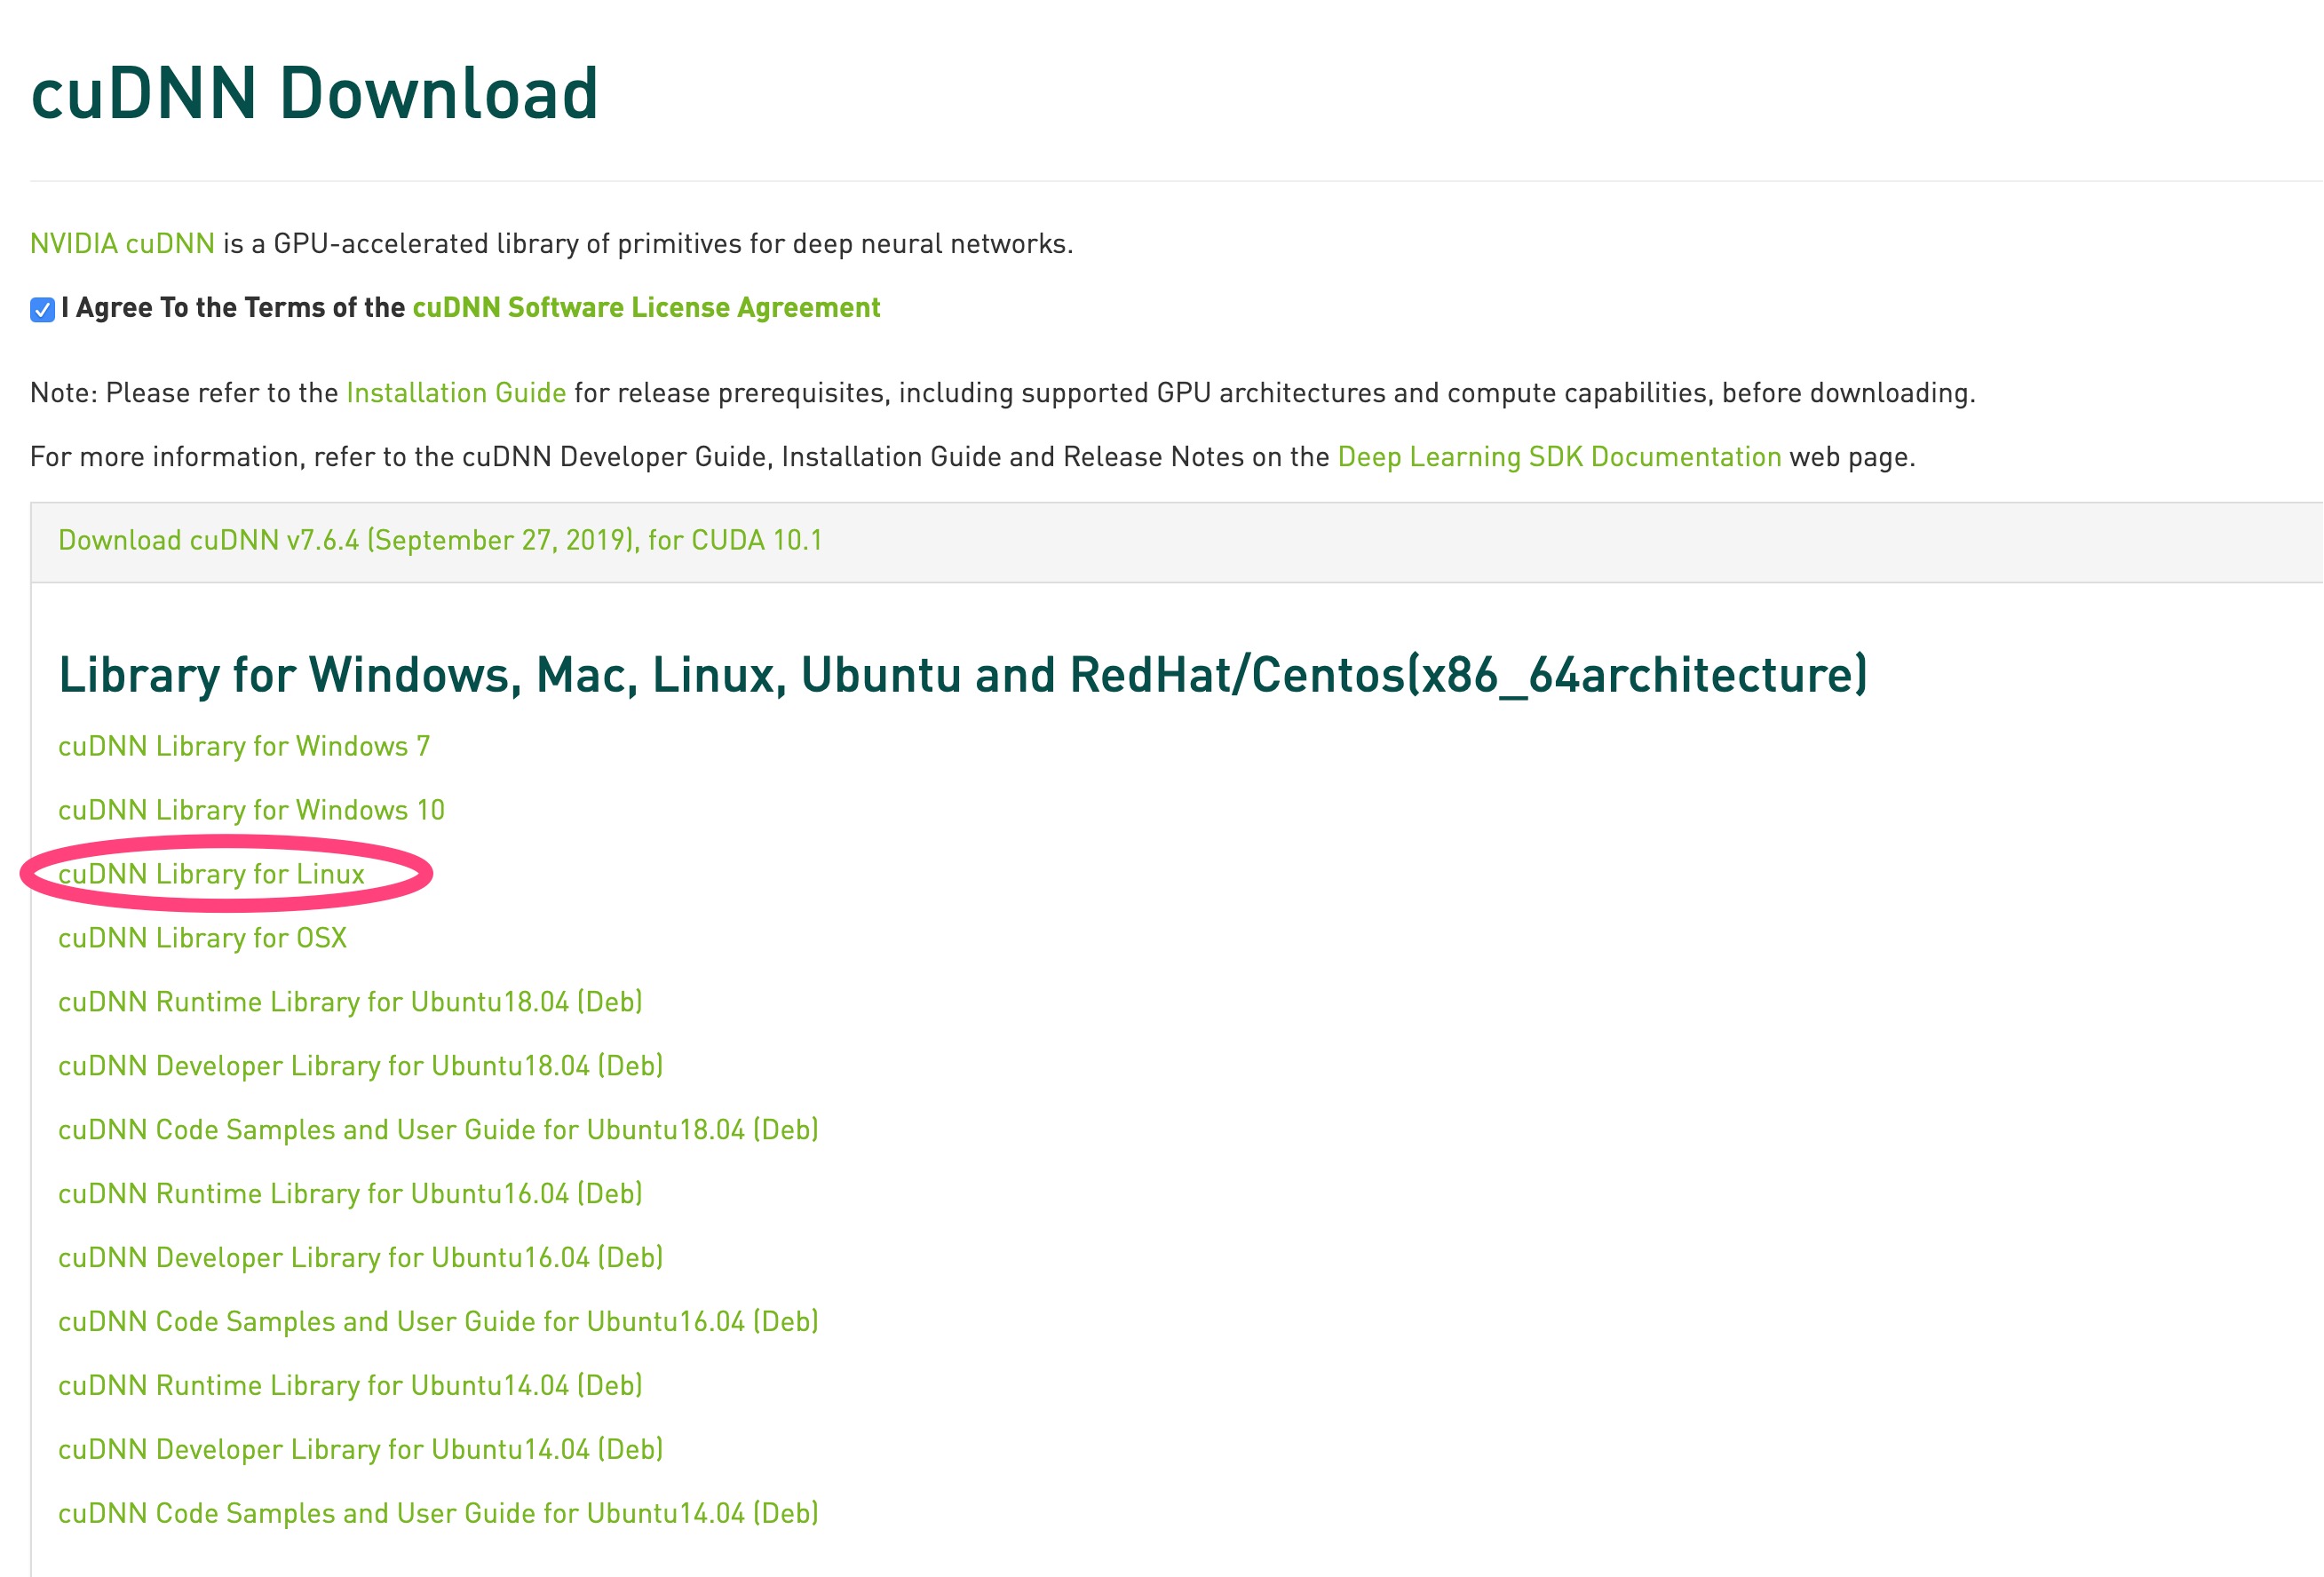
下载 cuDNN 7.6
需要登陆账号才能下载,选择使用QQ登陆就好了
下载地址 https://developer.nvidia.com/rdp/cudnn-download
选择 cuDNN Library for Linux 下载即可,如图所示
解压
tar xvf cudnn-*.tgz
拷贝文件
cd cuda
sudo cp include/* /usr/local/cuda/include/
sudo cp lib64/libcudnn.so.7.6.4 lib64/libcudnn_static.a /usr/local/cuda/lib64/
cd /usr/lib/x86_64-linux-gnu
sudo ln -s libcudnn.so.7.6.4 libcudnn.so.7
sudo ln -s libcudnn.so.7 libcudnn.so
配置环境变量
配置到 ~/.bashrc 或 /etc/profile 都可以
sudo vim /etc/profile , 加入以下内容
export LD_LIBRARY_PATH="$LD_LIBRARY_PATH:/usr/local/cuda/lib64:/usr/local/cuda/extras/CUPTI/lib64"
export CUDA_HOME=/usr/local/cuda
export PATH="$CUDA_HOME/bin:$PATH"
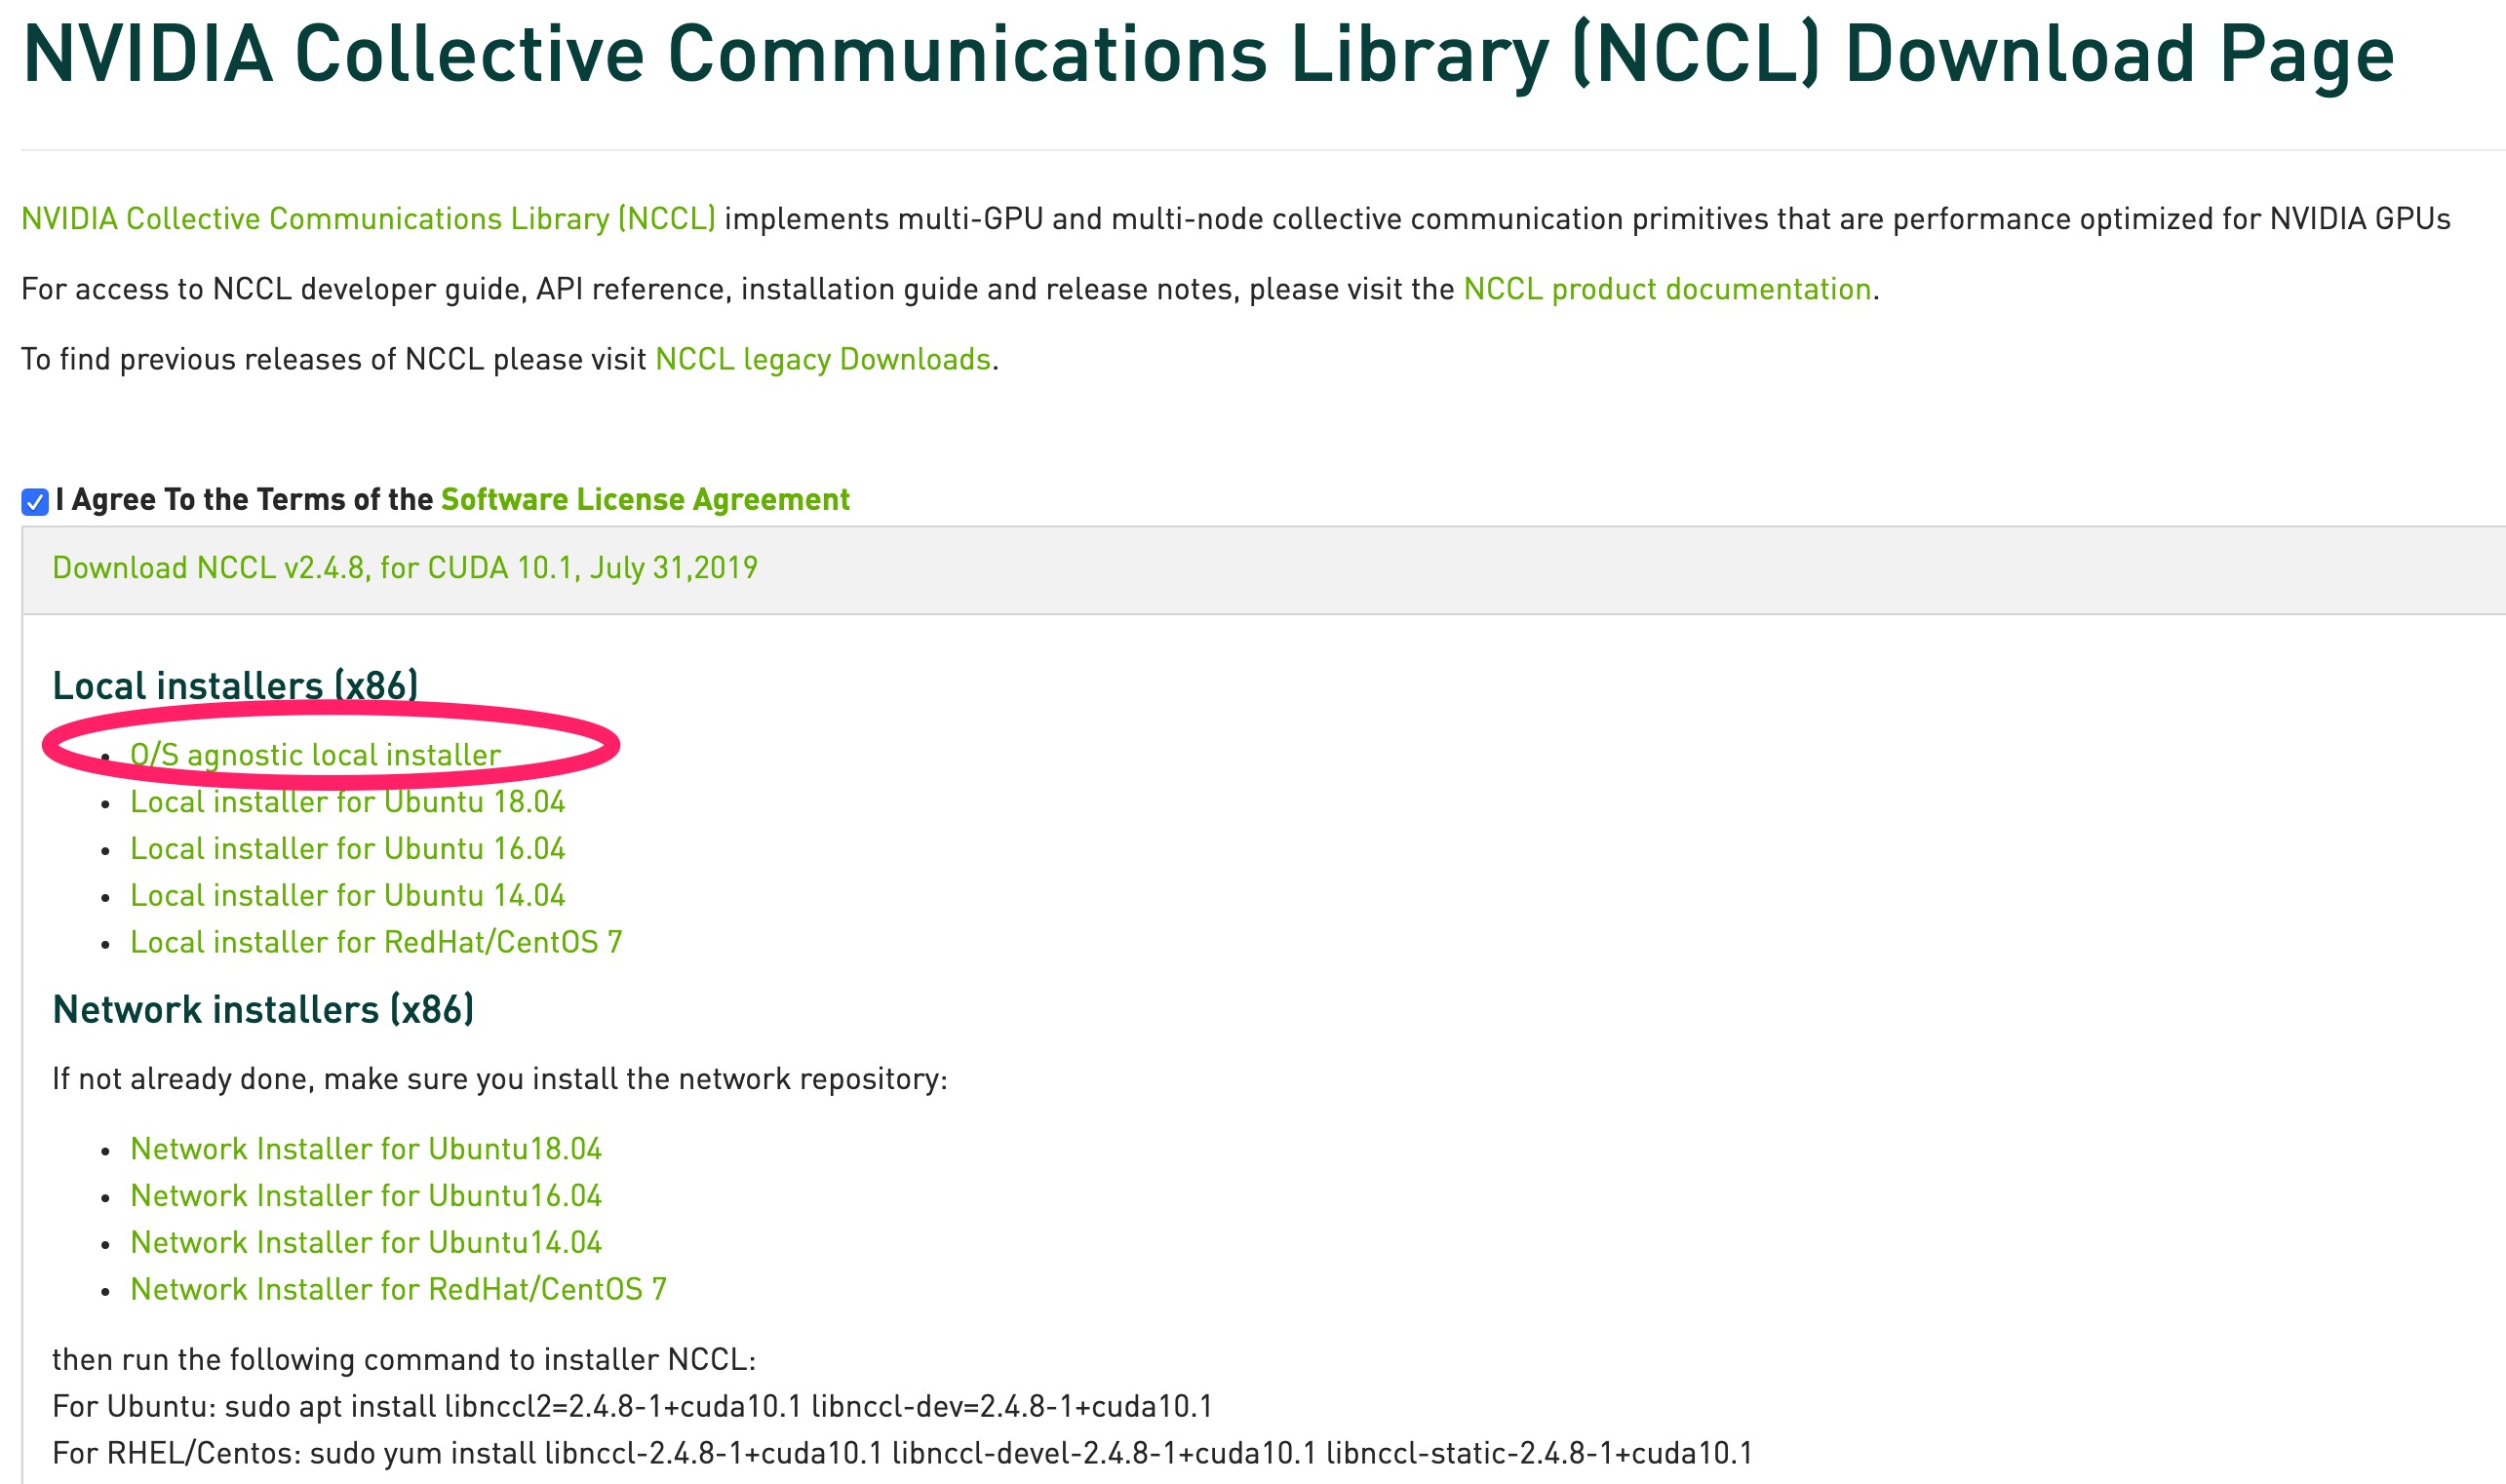
安装 NCCL 2.4.8
下载 NCCL 2.4.8
https://developer.nvidia.com/nccl/nccl-download
安装
tar xvf nccl_2.4.8-1+cuda10.1_x86_64.txz
cd nccl_2.4.8-1+cuda10.1_x86_64
sudo mkdir -p /usr/local/cuda/nccl/lib /usr/local/cuda/nccl/include
sudo cp *.txt /usr/local/cuda/nccl
sudo cp include/*.h /usr/include/
sudo cp lib/libnccl.so.2.4.8 lib/libnccl_static.a /usr/lib/x86_64-linux-gnu/
sudo ln -s /usr/include/nccl.h /usr/local/cuda/nccl/include/nccl.h
cd /usr/lib/x86_64-linux-gnu
sudo ln -s libnccl.so.2.4.8 libnccl.so.2
sudo ln -s libnccl.so.2 libnccl.so
for i in libnccl*; do sudo ln -s /usr/lib/x86_64-linux-gnu/$i /usr/local/cuda/nccl/lib/$i; done
如果不需要手动编译 tensorflow, JDK, Babel无需安装
安装JDK8
sudo apt install openjdk-8-jdk
安装babel 0.26.1
babel 版本不能高于 0.26.1,否则会提示
Please downgrade your bazel installation to version 0.26.1 or lower to build TensorFlow! To downgrade: download the installer for the old version (from https://github.com/bazelbuild/bazel/releases) then run the installer.
下载 babel 0.26.1
https://github.com/bazelbuild/bazel/releases/download/0.26.1/bazel-0.26.1-installer-linux-x86_64.sh
安装 babel 0.26.1
bazel 安装的时候不能放在中文文件夹下
sudo chmod 755 ./bazel-0.26.1-installer-linux-x86_64.sh
 ./bazel-0.26.1-installer-linux-x86_64.sh --user
配置环境变量
- 编辑脚本
sudo vim ~/.bashrc - 追加以下内容:
export PATH="$PATH:$HOME/bin" #放在文件末尾
- 使配置生效
source ~/.bashrc
检测babel 安装成功
bazel version
出现以下内容就算成功
WARNING: --batch mode is deprecated. Please instead explicitly shut down your Bazel server using the command "bazel shutdown".
Build label: 0.26.1
Build target: bazel-out/k8-opt/bin/src/main/java/com/google/devtools/build/lib/bazel/BazelServer_deploy.jar
Build time: Thu Jun 6 11:05:05 2019 (1559819105)
Build timestamp: 1559819105
Build timestamp as int: 1559819105
编译安装 tensorflow 2.0
不建议手动编译pip包, 因为国内的网络问题, download github 文件时基本会失败
下载 tensorflow 2.0
https://github.com/tensorflow/tensorflow/archive/r2.0.zip
解压
你可能还需要安装解压 zip 文件的软件, 执行该命令安装
sudo apt install unzip
unzip  tensorflow-r2.0.zip
cd tensorflow-r2.0
configure
WARNING: --batch mode is deprecated. Please instead explicitly shut down your Bazel server using the command "bazel shutdown".
You have bazel 0.26.1 installed.
Please specify the location of python. [Default is /usr/bin/python]: /usr/local/bin/python3

Found possible Python library paths:
  /usr/local/lib/python3.8/site-packages
Please input the desired Python library path to use.  Default is [/usr/local/lib/python3.8/site-packages]

Do you wish to build TensorFlow with XLA JIT support? [Y/n]:
XLA JIT support will be enabled for TensorFlow.

Do you wish to build TensorFlow with OpenCL SYCL support? [y/N]:
No OpenCL SYCL support will be enabled for TensorFlow.

Do you wish to build TensorFlow with ROCm support? [y/N]:
No ROCm support will be enabled for TensorFlow.

Do you wish to build TensorFlow with CUDA support? [y/N]: y
CUDA support will be enabled for TensorFlow.

Do you wish to build TensorFlow with TensorRT support? [y/N]:
No TensorRT support will be enabled for TensorFlow.

Found CUDA 10.1 in:
    /usr/local/cuda/lib64
    /usr/local/cuda/include
Found cuDNN 7 in:
    /usr/local/cuda/lib64
    /usr/local/cuda/include


Please specify a list of comma-separated CUDA compute capabilities you want to build with.
You can find the compute capability of your device at: https://developer.nvidia.com/cuda-gpus.
Please note that each additional compute capability significantly increases your build time and binary size, and that TensorFlow only supports compute capabilities >= 3.5 [Default is: 3.5,7.0]: 7.5


Do you want to use clang as CUDA compiler? [y/N]:
nvcc will be used as CUDA compiler.

Please specify which gcc should be used by nvcc as the host compiler. [Default is /usr/bin/gcc]:


Do you wish to build TensorFlow with MPI support? [y/N]:
No MPI support will be enabled for TensorFlow.

Please specify optimization flags to use during compilation when bazel option "--config=opt" is specified [Default is -march=native -Wno-sign-compare]:


Would you like to interactively configure ./WORKSPACE for Android builds? [y/N]:
Not configuring the WORKSPACE for Android builds.

Preconfigured Bazel build configs. You can use any of the below by adding "--config=<>" to your build command. See .bazelrc for more details.
        --config=mkl            # Build with MKL support.
        --config=monolithic     # Config for mostly static monolithic build.
        --config=gdr            # Build with GDR support.
        --config=verbs          # Build with libverbs support.
        --config=ngraph         # Build with Intel nGraph support.
        --config=numa           # Build with NUMA support.
        --config=dynamic_kernels        # (Experimental) Build kernels into separate shared objects.
        --config=v2             # Build TensorFlow 2.x instead of 1.x.
Preconfigured Bazel build configs to DISABLE default on features:
        --config=noaws          # Disable AWS S3 filesystem support.
        --config=nogcp          # Disable GCP support.
        --config=nohdfs         # Disable HDFS support.
        --config=noignite       # Disable Apache Ignite support.
        --config=nokafka        # Disable Apache Kafka support.
        --config=nonccl         # Disable NVIDIA NCCL support.
Configuration finished
手动编译 pip 包
bazel build --config=opt --config=cuda --config=v2 //tensorflow/tools/pip_package:build_pip_package
pip 安装 tensorflow-gpu
截止本文发表日期时, tensorflow2.0 尚不支持GPU版本
pip3 instal tensorflow-gpu
pip 安装 pytorch
pip3 install torch torchvision